Overview
When a new campaign is started, creatures do not spawn in each region; the game only populates regions when they are loaded for the first time. Upon entering a region for the first time, one set of creatures will spawn from all dens in that region. When slugcat hibernates, all those spawns will save and become permanent. However, if a region is loaded multiple times before its spawns are saved, one set of creatures will spawn for each load. A region can be loaded by:
- Entering the target region via a gate
- Starving in the target region
- Waking up in the target region’s gate via a gatewarp
When more than one set of creatures has spawned in a region, that region has been multispawned. If slugcat hibernates (not starves), the multispawn will save and become permanent. If slugcat dies before saving the spawns, spawns will be reset, but multispawning can be attempted again.
Doublespawning regions is the simplest form of multispawning, as it simply requires starving in the target region the first time it is entered. To multispawn regions further, it becomes necessary to enter the region multiple times in a cycle. For example, to triplespawn Chimney Canopy, you would need to start in The Exterior, pass through upper CC (1 load), do a loop to enter CC again through the Industrial Complex gate (2 loads), then starve in CC (3 loads). Spawns will multiply immediately, but will only become permanent after hibernating again. Video of Route
Only creatures that spawn from dens will be multispawned. Creatures such as hazers or vulture grubs, which are placed as objects, will not be affected if their region is multispawned. Leeches also cannot be multispawned.
Relation to Lineages
As lineages are based on dens, killing a multispawned creature will result in the lineage chance rolling for all creatures from that den. This makes lineaging quicker, and can even be used to bypass multiple steps of a lineage tree at once. When a lineage den progresses to the next stage, all dead creatures will progress to the next step; live creatures will progress to the next stage when they are killed. Respawn rolls are independent from lineage rolls, and are rolled independently for each creature.
When multiple creatures from a multispawned den are killed and attempt to respawn, only one can respawn each time the region is loaded. For example, if a 5x spawned pole plant den is bombed, even if multiple pole plants pass the respawn check only one will spawn next cycle. The cycle after, two will appear, and so on.
For example, if Outskirts is triplespawned, 3 green lizards will spawn from this den.


On the next cycle, two are killed. Both pass the respawn check, but only one is able to respawn. The lineage fails on each.
The next cycle, one is killed, and the lineage succeeds. One passes the respawn check, but the den is at an empty lineage stage. The lizard that was not killed remains a green lizard.

Next cycle, both lizards attempt to respawn, and one passes the empty lineage check, progressing to the pink lineage. Only one is able to respawn. The green lizard has not been killed, so it doesn’t lineage.

Next, the two pink lizards are killed. They both pass the lineage check, bypassing the cyan lineage entirely and skipping straight to the red. One passes the respawn check and respawns the next cycle.

Finally, the green lizard is killed and respawns. It skips straight to the red lizard, as the den has progressed to that stage of the lineage tree. The other lizard does not pass the respawn check.
Killing a creature and having it pass the lineage check, then multispawning the region by leaving and reentering it, will cause the multispawned creature to be one step higher in the lineage tree. This is referred to as One Cycle Lineaging.
Downpour DLC
Chainstarving is a Jolly-Coop exclusive tech that tricks the game into allowing multiple starve cycles in a row. By setting Jolly-Coop’s difficulty to easy, a cycle is considered successful if the number of player Slugcats in a shelter is equal to or greater than the number of living player Slugcats when the cycle ends. If there are no living player Slugcats when the door closes, this condition is still met. There are at least two ways to achieve this:
- By having Slugcat be destroyed in the shelter room (such as by the deathplane after getting out of bounds).
- By exiting the shelter (such as by clipping though the shelter pipe or using a link to get out of the shelter) and being killed outside the shelter.
Once the cycle ends, if there is not enough food for a successful hibernation, a starve cycle will trigger. Starve cycles caused by chainstarving function identically to normal starve cycles. If Slugcat dies or visit an Echo, all consecutive starve cycles are rolled back. Like regular starving, chainstarving can be used to multispawn regions arbitrarily many times.
Watcher DLC
While playing as the Watcher, starving does not trigger spawns to multiply. However, since portals can be used multiple times in a single cycle, it is possible to multiply the spawns in any region indefinitely simply by standing in the portal and repeatedly reentering it. This is referred to as Portal Multispawning.
Region Guides
This section includes guides on how to reach the maximum level of multispawning in each region. There may be other routes, but only one is listed. Note that it isn’t possible to obtain all maximum multispawns on a single save.
Vanilla
These routes are for the vanilla slugcats and assume that MSC is not enabled.
Outskirts:
Survivor/Monk: 2x
Hunter: 3x (LF-SU-DS-GW-HI-SU-Starve)
Survivor/Monk with DAKR: 3x (SU-DS-GW-HI-SU-Starve)
Industrial Complex:
All: 4x (Gatewarp into GATE_HI_SH-HI-SH-SL-GW-HI-Starve-CC-SI-LF-SU-HI)
Drainage System:
All: 3x (SB-DS-Starve-GW-HI-SU-DS)
Chimney Canopy:
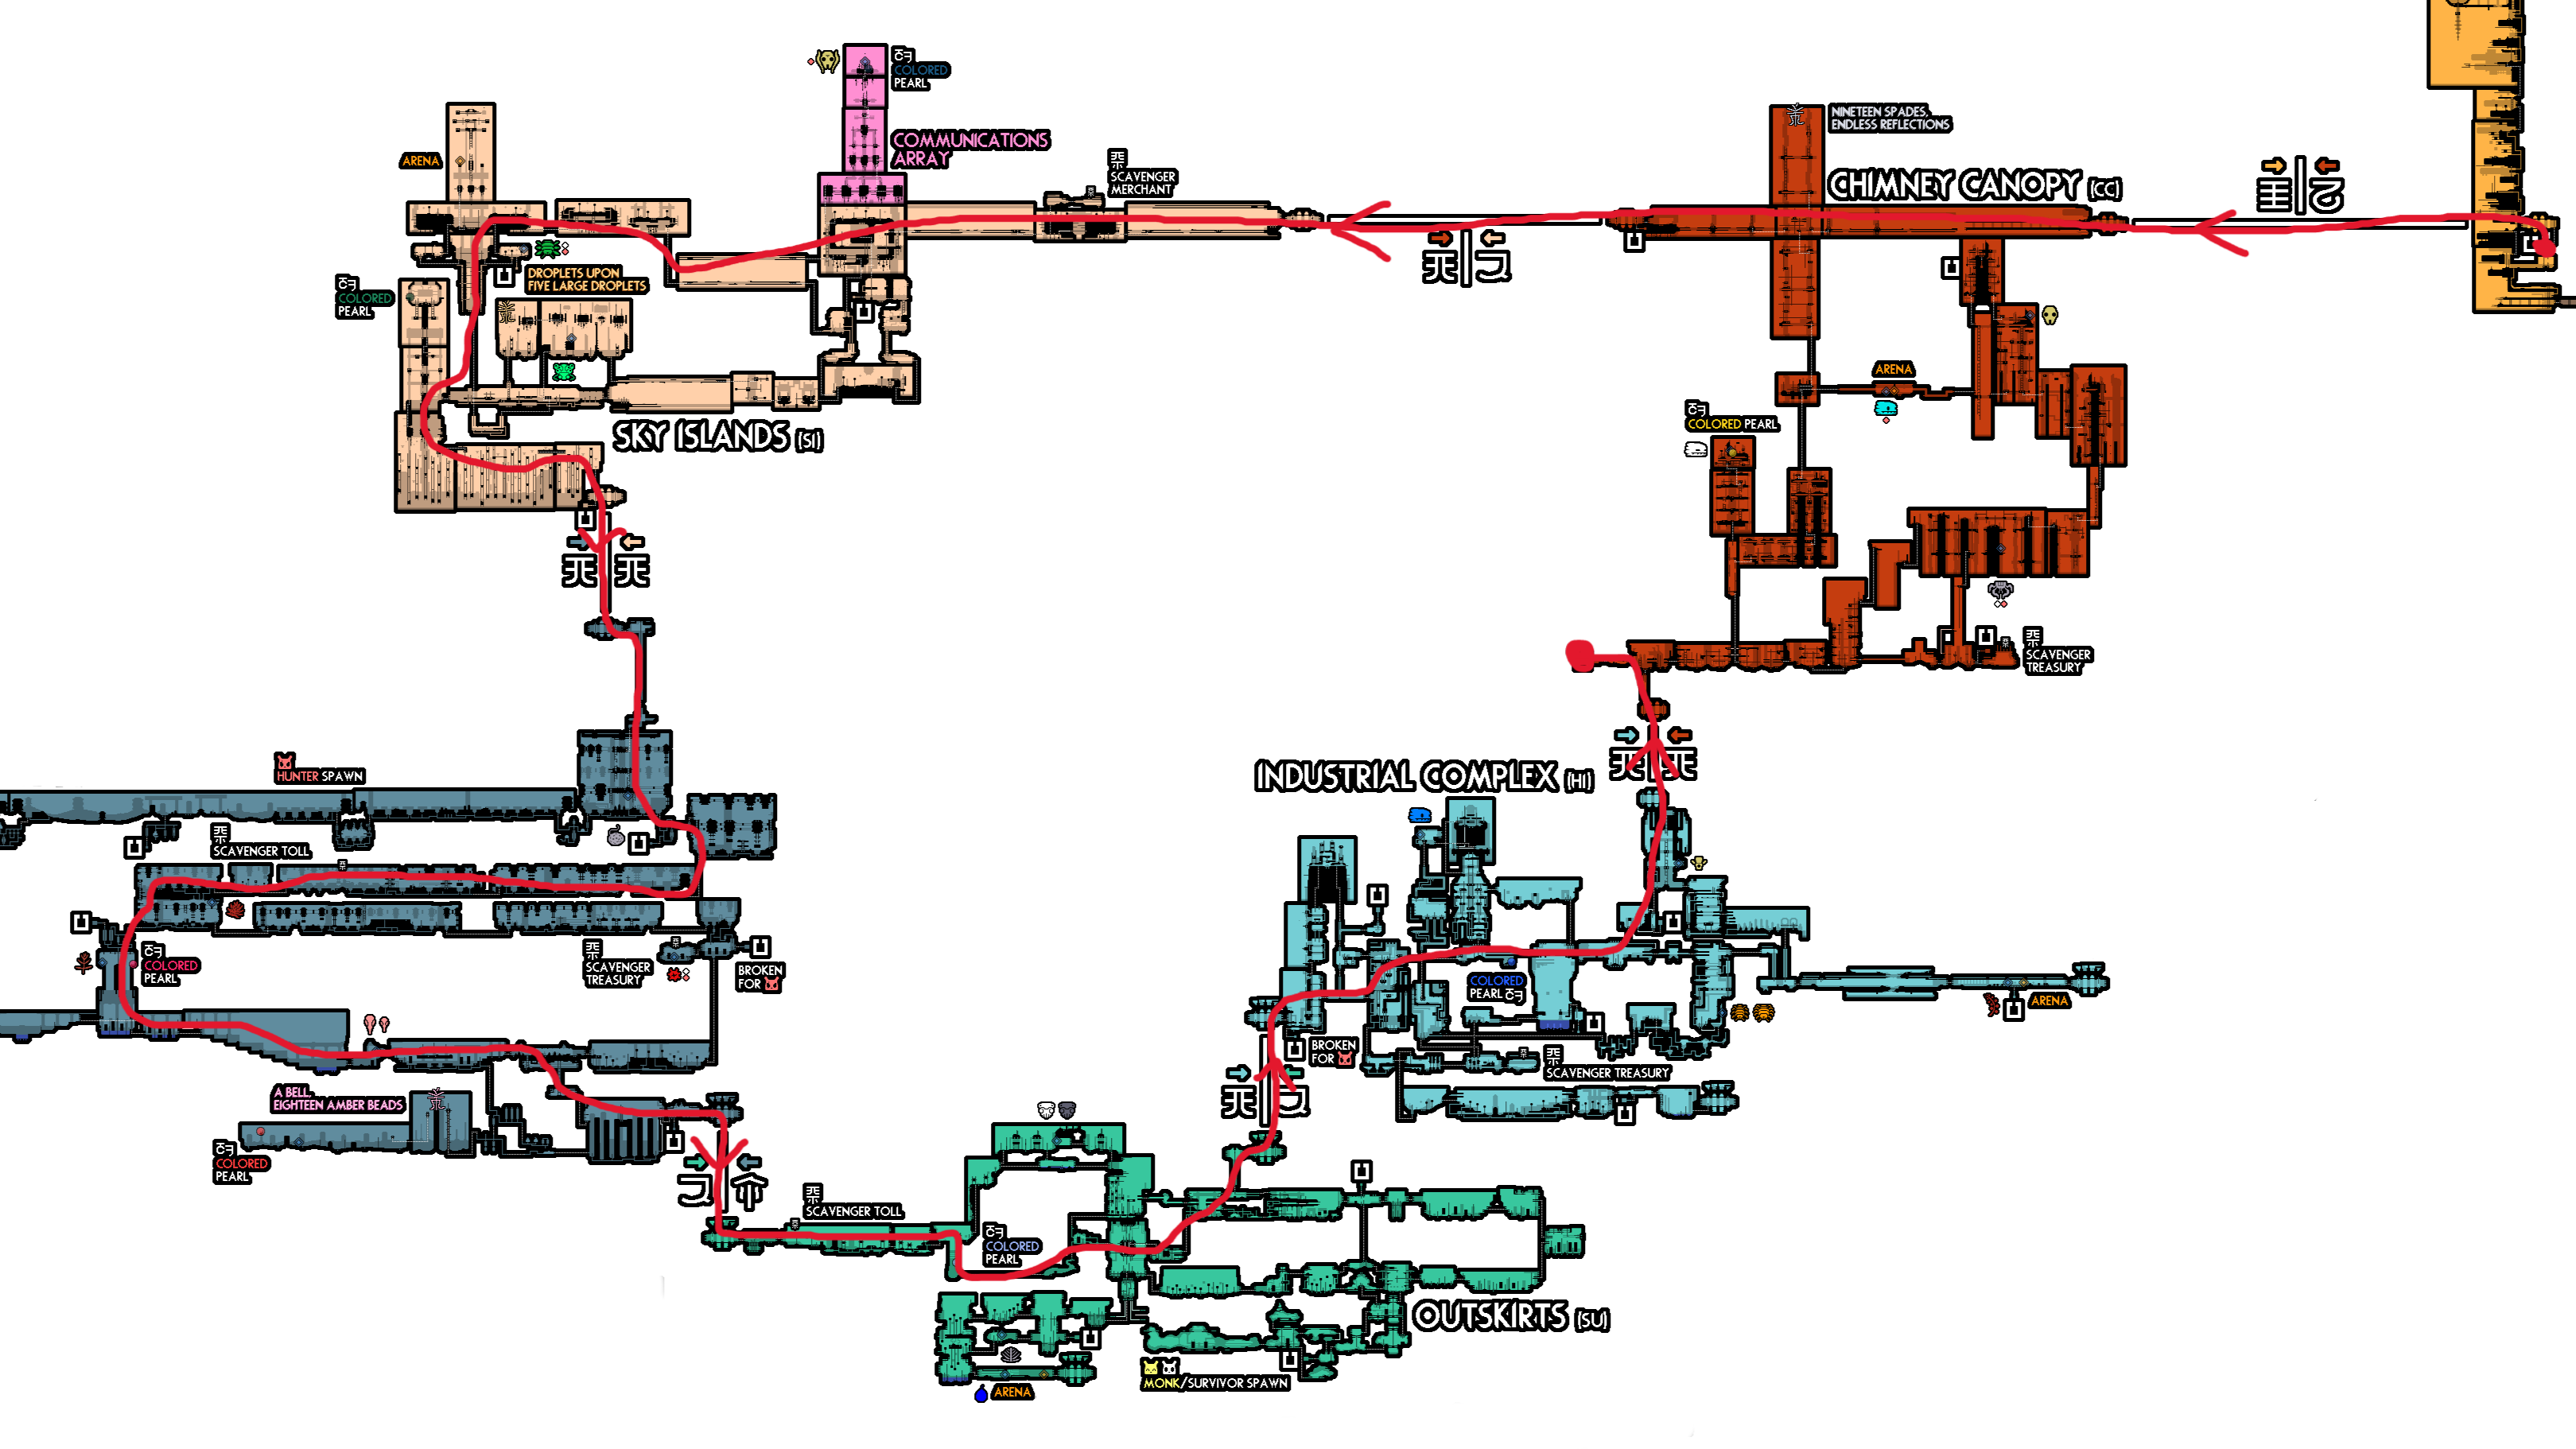
All: 3x (UW-CC-SI-LF-SU-HI-CC-Starve) Example
Garbage Wastes:
All: 3x (SL-GW-Starve-HI-SU-DS-GW)
Shaded Citadel:
All: 3x (UW-SH-Starve-HI-GW-SL-SH)
Shoreline:
All: 3x (SB-SL-Starve-GW-HI-SH-SL) Example
Sky Islands:
All: 3x (Gatewarp into GATE_SI_CC-SI-Starve-LF-SU-HI-CC-SI)
Farm Arrays:
Survivor/Monk: 3x (SI-LF-Starve-SB-DS-SU-LF)
Hunter: 2x
Hunter with DAKR: 3x (LF-SI-CC-HI-SU-LF-Starve)
The Exterior:
All: 3x (CC-UW-SS-UW-Starve)
Five Pebbles:
All: 2x
Subterranean:
All: 3x (LF-SB-Starve-DS-GW-SL-SB)
Downpour
Precycles can be used for multispawning as all slugcats except Saint, providing extra time. For some routes, marked with *** , this is necessary.
Outskirts:
Survivor/Monk/Spearmaster: 2x
Survivor/Monk/Spearmaster with DAKR: 3x (SU-DS-GW-HI-SU-Starve)
Other: 3x (LF-SU-DS-GW-HI-SU-Starve)
Industrial Complex:
Saint: 4x (Gatewarp into GATE_HI_SH-HI-CL-GW-HI-Starve-CC-SI-LF-SU-HI)
Other: 4x (Gatewarp into GATE_HI_SH-HI-SH-GW-HI-Starve-CC-SI-LF-SU-HI)
Drainage System:
Rivulet: 2x
Rivulet with DAKR***: 3x (DS-Starve-GW-HI-SU-DS) Example
Saint**: 2x
Other: 3x (SB-DS-Starve-GW-HI-SU-DS)
Chimney Canopy:
Saint: 3x (SI-CC-HI-SU-UG-CC-Starve)
Other: 3x (UW-CC-SI-LF-SU-HI-CC-Starve) Example
Garbage Wastes:
Artificer: 1x (Spawns are saved during the intro)
Spearmaster: 4x (Gatewarp into GATE_GW_SL-GW-LM-SH-GW-Starve-HI-SU-DS-GW)
Other: 4x (Gatewarp into GATE_GW_SL-GW-SL-SH-GW-Starve-HI-SU-DS-GW)
Shaded Citadel:
Gourmand: 3x (SH-Starve-HI-GW-SH)
Saint: N/A
Other: 3x (UW-SH-Starve-HI-GW-SL-SH) (Maybe 4x for some by gatewarping in SH_UW)
Shoreline:
Artificer: N/A
Spearmaster**: 2x
Other: 4x (Gatewarp into GATE_SL_VS-VS-SB-SL-Starve-GW-SH-SL)
Sky Islands:
Saint: 2x
Other: 3x (LF-SI-Starve-CC-HI-VS-SI)
Farm Arrays:
Hunter: 2x
Hunter with DAKR: 3x (LF-SI-CC-HI-SU-LF-Starve)
Other: 3x (SI-LF-Starve-SB-DS-SU-LF)
The Exterior:
Saint: N/A
Hunter: 3x (CC-UW-SS-UW-Starve)
Spearmaster and Artificer: 4x (SL-UW-SS-UW-Starve-CC-HI-SH-UW) Example
Other: 4x (Passage to Precipice-SL-UW-SS-UW-Starve-CC-HI-SH-UW)
Five Pebbles:
Rivulet**: 2x
Saint: N/A
Survivor, Hunter, Gourmand, and Inv: (slugpup wrongden gatewarp into GATE_SS_UW-SS-UW-SS-Starve)
Other: 2x
Subterranean:
Hypothetical route for all but Saint: 4x (OE warp or passage and (if necessary) gatewarp in GATE_OE_SB-SB-DS-SU-LF-SB-Starve-VS-SL-SB)
Other: 3x (LF-SB-Starve-DS-GW-SL-SB)
Pipeyard
All: 3x (SI-VS-Starve-HI-SU-DS-SB-VS)
Submerged Superstructure
Artificer: N/A
Spearmaster**: 2x (GATE_SL_MS crashes the game)
Other: 3x (Gatewarp into GATE_MS_SL-MS-SL-Gate Bypass in GATE_SL_MS-MS) Example
Outer Expanse
Saint: N/A
Survivor and Gourmand: 3x (slugpup wrongden gatewarp into GATE_OE_SU-OE-SU-DS-SB-OE)
Other: 2x (OE Warp may be necessary)
Waterfront Facility
Artificer: 3x (GW-LM-Starve-UW-SH-LM)
Spearmaster: 4x (GW-LM-Starve-UW-SH-LM-DM-LM)
Other: N/A
Metropolis
Saint: N/A
Other: 2x
The Rot
Rivulet: 2x
Other: N/A
Looks to the Moon
Spearmaster: 2x
Other: N/A
Undergrowth
Saint: 3x (GW-UG-CC-HI-SU-UG-Starve) Example
Other: N/A
Silent Construct
Saint: 3x (SL-CL-Starve-GW-HI-CL)
Other: N/A
Rubicon
Saint: 2x
Other: N/A
** Requires Time Travel
*** A precycle is required
Watcher
Prologue Regions
All: 1x (Watcher cannot multispawn by starving)
Other Regions
All: Unlimited (See portal multispawning)
Related Pages
chainstarve, portalmultispawning, onecyclelineaging, outofbounds, wrongden, gatewarp, timetravel, slugpupwrongden