Status: #partdone
Note Type:
Tags: #score, #spoilers
Saint and Monk Passages as Hunter
During Score Runs, the player is always trying to maximize the amount of kills during each cycle, so spending 5 and 6 cycles doing the Monk and Saint Passages - respectively - can significantly lower the final score. To avoid this, most runs will use the passage storage glitch to get both Passages at the same time, without wasting any cycles and also getting some Wanderer progress.
As explained in in the Passages page, achieving Monk means eating only "vegetarian" food for 5 cycles, while achieving Saint requires spending 6 cycles without harming any other creature.
Starting conditions
It doesn't matter too much at what point in a run the player decides to start doing the Saint/Monk cycles. As long as Hunter has the ability to meet echoes and the Survivor Passage has already been completed, hibernating while fulfilling the Passages' conditions will start Saint/Monk progress. It is also worth noting that Hunter does not need to priorly go to an Echo's location to "prime it" like Survivor does.
Currently, the optimal shelter to start the Saint/Monk cycles is the upper one in Industrial Complex, HI_S05. You'll want to hibernate in this shelter with 2 objects stored in it: a "vegetarian" food and a King Vulture mask. For the first item, there are easy blue fruits no more then two rooms away, in HI_C11 and HI_A11 - or alternatively, a neuron from Five Pebbles can be brought along. For the second item, please read the vulture hunting guide or the vulture cheesing page.
The loop
As explained in the passage storage page, dying or meeting an Echo in a starve cycle will keep the Passage progress of the previous cycle, even though the game returns to the beginning of said previous cycle.
So to get both the Monk and the Saint Passages without losing a single cycle, the player will repeat the following loop:
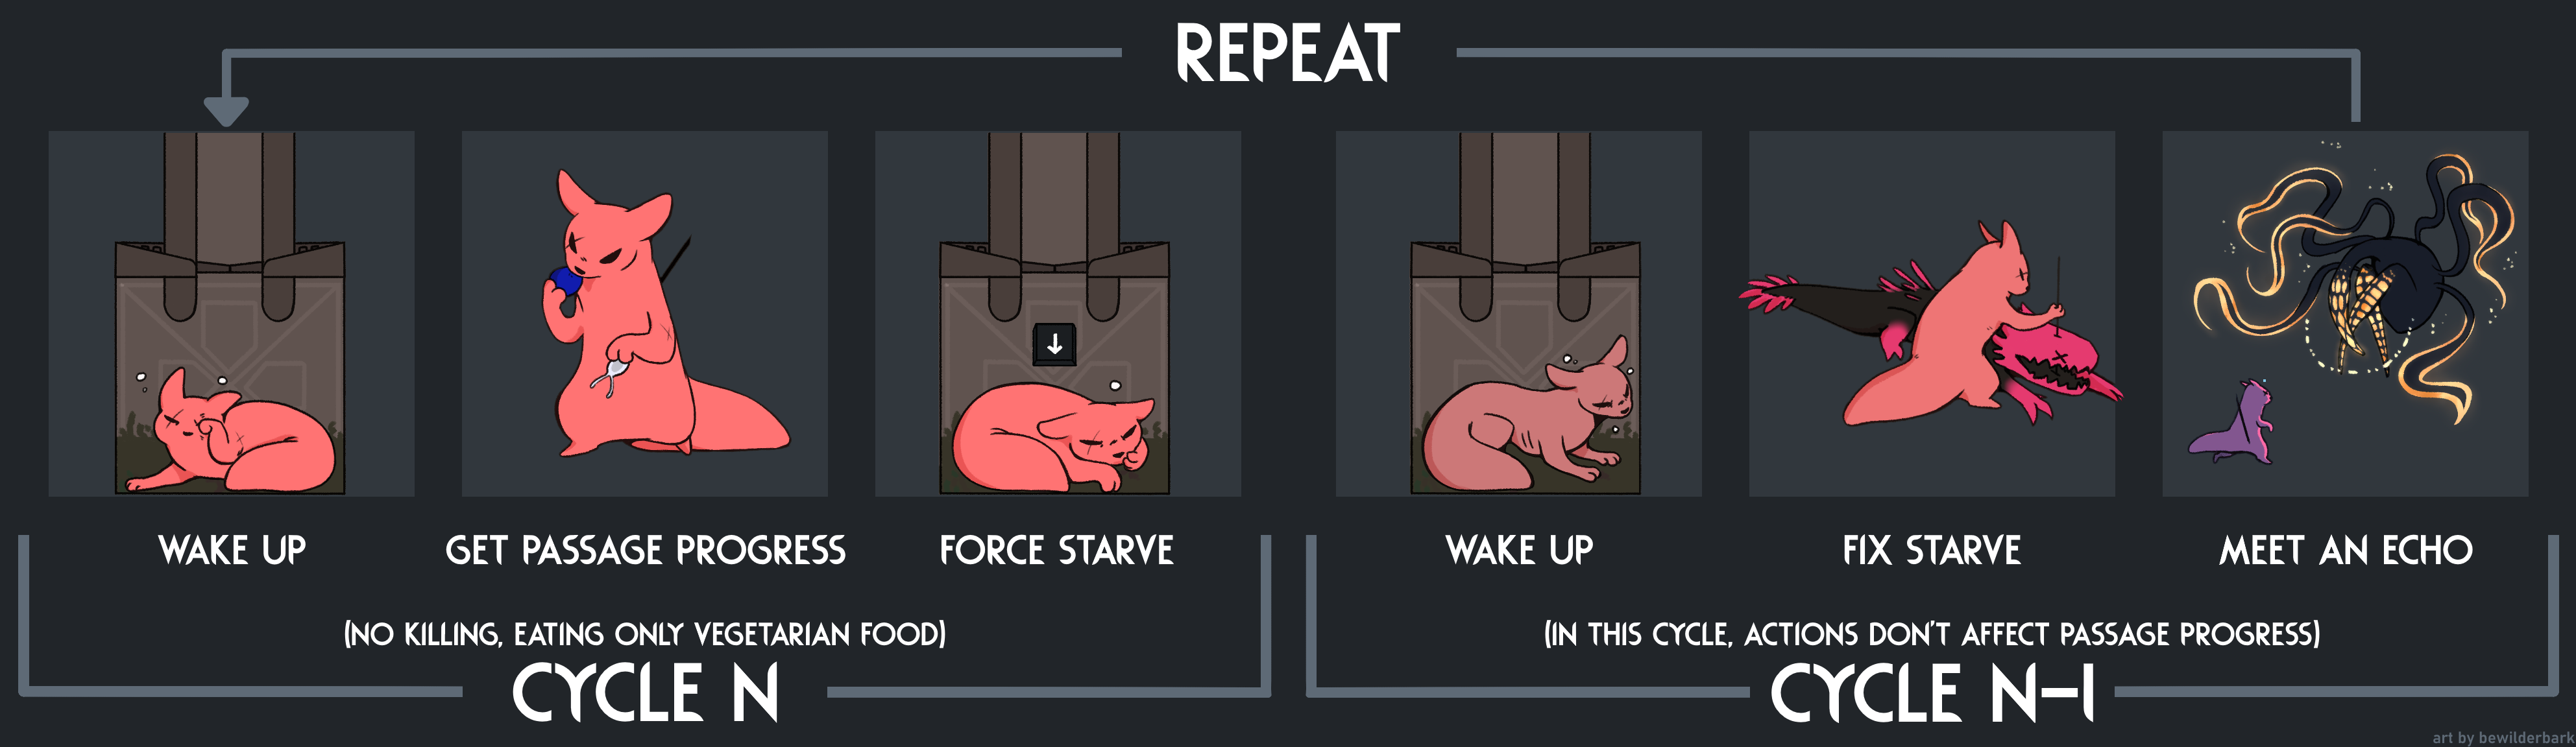
- Wake up in "cycle N".
- Spend the whole cycle without harming any creatures and eat one "vegetarian" food (generally the one you stored in the shelter), but do not eat to full.
- Starve, 'saving' passage progress.
- Wake up in "cycle N-1".
- Play the cycle normally, going towards an Echo. Fix the starve if necessary.
- Meet an Echo and automatically return to step 1.
Since dying while starving is forbidden in a Score Run, the player should always end these "loop cycles" by meeting an Echo. In the case of accidental death, the player will have to repeat whatever they did to obtain Passage progress in "cycle N", as stated by the rules.
Standard Echo routes
The following routes are the most common ones used during Score Runs. This is because they are easier or more efficient. Most of the routes also get Wanderer Passage progress by hibernating in previously unvisited regions.
HI > CC > UW > Wall Echo (UW_A14)
This route is pretty straight forward. It requires going through Chimney Canopy and half of the Wall without harming any creatures. Starving at UW_S03, the higher Wall shelter, allows for an optional starve fix with the white lizards from UW_F01. It also achieves the Exterior Wanderer pip.
The trickiest part of this route is probably UW_J01, since it's a very big room filled with cyan lizards. Using orbskip can be helpful to outspeed them.
Example route:
HI_S05 > HI_A10 > HI_C11 > GATE_HI_CC > CC_A16 > CC_C08 > CC_B06 > CC_B05 > CC_B08 > CC_A15 > CC_C07 > CC_A06 > CC_H01 > GATE_CC_UW > UW_D07 > UW_D01 > UW_A01 > UW_J01 > UW_A02 > UW_E01 > UW_A13 > UW_S03 (starve) > UW_A13 > UW_F01 > UW_A12 > UW_A14
HI > SU > LF > Farm Arrays Echo (LF_B01)
This route is the easier one to get the Farm Arrays Wanderer pip. It involves crossing both Industrial Complex and Outskirts without harming any creatures, followed by a starve in the lower Farm Arrays shelter, LF_S05. This route has a very easy starve fix with the popcorn plant in LF_A14, but it is also optional since the Echo is only a few rooms away and there are generally no dangerous creatures nearby.
It's important to remember that there is a toll just before the Farm Arrays gate. Luckily, there is a pearl that is easy to get in HI_B08.
Example route:
HI_S05 > HI_A10 > HI_B06 > HI_C04 > HI_B08 (pearl) > HI_C02 > HI_A07 > HI_B04 > GATE_SU_HI > SU_B13 > SU_A33 > SU_A20 > SU_A29 > SU_B02 > SU_A12 > SU_B06 > SU_B05 > SU_A07 > SU_C02 > SU_A45 > GATE_LF_SU > LF_A14 > LF_S05 (starve) > LF_A14 (fix) > LF_D04 > LF_A11 > LF_A12 > LF_B01
HI > CC > SI > Sky Islands Echo (SI_B11)
This route involves crossing both Chimney Canopy and Sky Islands without harming any creatures, but there are two reasonable shelters that can be used for the starve. Starving in the eastern shelter, SI_S05, means not having to travel most of Sky Islands under the Saint restrictions and having a relatively safe starve fix using the squidcadas from SI_D01. However, starving in the western shelter, SI_S04, provides a safer walk to the Echo that needs no starve fix.
To cross Sky Islands while keeping a vulture mask, it's useful to know how to do the two-hand glitch. This route achieves the Sky Islands Wanderer pip.
Example route:
HI_S05 > HI_A10 > HI_C11 > GATE_HI_CC > CC_A16 > CC_C08 > CC_B06 > CC_B05 > CC_B08 > CC_A15 > CC_C07 > CC_A06 > CC_C09 > GATE_SI_CC > SI_D03 > SI_B01 > SI_C03 > SI_D01 > SI_C04 > SI_C01 > SI_C02 > SI_A18 > SI_S04 (starve) > SI_A18 > SI_C05 > SI_A28 > SI_D06 > SI_B11
HI > GW > SL > SH > Shaded Citadel Echo (SH_A08)
This is one of the hardest Echo routes in the run and it generally requires a very lengthy cycle. It consists of traveling through most of Industrial Complex and the entirety of both Garbage Wastes and Shoreline without harming any creatures, finally starving on SL_S02. From there, the starve can be fixed on the popcorn plant in SL_C11 and then the journey to the Echo in SH_A08 is generally less troublesome. This route achieves the Shoreline Wanderer pip.
There a Scavenger Toll that needs to be crossed in Garbage Wastes, however a pearl is generally available two rooms before it, in GW_A22. Knowing how to do the two-hand glitch is also beneficial for the Shoreline section.
Example route:
HI_S05 > HI_A10 > HI_B06 > HI_C04 > HI_A25 > HI_A16 > HI_A17 > HI_A18 > HI_C05 > HI_A06 > HI_A24 > HI_A19 > GATE_HI_GW > GW_B01 > GW_A01 > GW_A05 > GW_A08 > GW_A06 > GW_A07 > GW_A10 > GW_D01 > GW_B03 > GW_C02 > GW_A13 > GW_B06 > GW_A22 (pearl) > GW_A23 > GW_C11 > GW_C04 > GW_B08 > GATE_GW_SL > SL_A08 > SL_C12 > SL_F01 > SL_C02 > SL_D06 > SL_B01 > SLC01 > SL_A02 > SL_B02 > SL_C11 > SL_S02 (starve) > GATE_SH_SL > SL_C11 (fix) > GATE_SH_SL > SH_C13 > SH_E05 > SH_A04 > SH_B04 > SH_A23 > SH_A09 > SH_A08
HI > SU > LF > SB > Subterranean Echo (SB_A10)
This route is more open-ended then the previous ones, but it can still be quite challenging and heavily luck dependant. It requires travelling peacefully through Industrial Complex, Outskirts and around half of Farm Arrays, however there are two commonly used shelters for the starve.
The first option is starving on LF_S03. This shelter has the benefit of having a generally easy Mont/Saint cycle, but the starve fix can be quite troublesome, since the centipedes in LF_B04 are not enough to fill of of Hunter's food pips. This means a wolf spider or red spider will have to be killed and consumed in LF_D06.
The second option is starving on LF_S01. This generally aims to compensate a shorter Saint/Monk cycle and using the flood to get to the top part of LF_D06. It is then possible to fix the starve using the centipedes that spawn in that same room with the sporepuffs.
Just like the route to the Farm Arrays Echo, getting a pearl in HI_B08 is recommended to cross the Outskirts Scavenger Toll.
Example route:
HI_S05 > HI_A10 > HI_B06 > HI_C04 > HI_B08 (pearl) > HI_C02 > HI_A07 > HI_B04 > GATE_SU_HI > SU_B13 > SU_A33 > SU_A20 > SU_A29 > SU_B02 > SU_A12 > SU_B06 > SU_B05 > SU_A07 > SU_C02 > SU_A45 > GATE_LF_SU > LF_A14 > LF_D04 > LF_B05 > LF_B03 > LF_C01 > LF_B02 > LF_D01 > LF_E01 > LF_D02 > LF_D06 > LF_A01 > LF_E05 > LF_B04 > LF_S03 (starve) > LF_D06 (fix) > LF_A05 > LF_J01 > LF_C03 > GATE_LF_SB > SB_F03 > SB_A10
HI > CC > Chimney Canopy Echo (CC_C12)
This is a very simple route compared to the other ones. It involves starving in the same shelter you normally start in, HI_S05, then fixing your starve in Industrial Complex with the popcorn plant in HI_B09 and climbing up to the Chimney Canpy Echo in CC_C12.
It is worth noting that, sometimes, runners opt not to meet the Chimney Canopy Echo. This implies spending a normal cycle following Saint requirements, but can compensate the points by keeping vulture cheese as an option for later in the run.
Example route:
HI_S05 > HI_A10 > HI_C11 > HI_B09 (fix) > HI_C11 > GATE_HI_CC > CC_A16 > CC_C08 > CC_B06 > CC_B05 > CC_B08 > CC_A15 > CC_C07 > CC_A06 > CC_C12
Other Echo routes
HI > SH > Shaded Citadel Echo (SH_A08)
This is another possible route to get the Shaded Citadel Echo. It leaves the Shoreline Wanderer pip for later in the run, possibly when resting at Subterranean. Generally, this route starves at the starting shelter and fixes it with the HI_B09 popcorn plant.
The player can also opt for a Saint/Monk run through Shaded CItadel and starve in SH_S02, but there are no reliable ways to fix that starve.
Example route:
HI_S05 > HI_A10 > HI_C11 > HI_B09 (fix) > HI_B07 > HI_B14 > HI_D01 > HI_C13 > GATE_HI_SH > SH_C11 > SH_D01 > SH_A25 > SH_A11 > SH_A12 > SH_A14 > SH_C02 > SH_B08 > SH_B01 > SH_C10 > SH_A21 > SH_C01 > SH_A06 > SH_B02 > SH_B03 > SH_C04 > SH_A07 > SH_B04 > SH_A23 > SH_A09 > SH_A08
Friend Passage
There is a viable strategy which involves getting the Friend Passage at the same time as the first Saint and Monk pips. It starts by befriending a lizard from the upper part of Industrial Complex, generally a cyan, and sleeping with it and a vegetarian food in HI_S05.
This creates a restriction of having to starve with the lizard for the first two Saint/Monk cycles, also meaning these cycles will probably have to be focused on getting nearby Echos. However, the friendly lizard can be stabbed and eaten in "cycle n-1" with no consequence (as long as the loop is completed), making the starve fix easier.